
INTRODUCTION
Hello there, fellow image editor! If you’ve been in the world of photo editing for a while, especially when it comes to services like clipping path, photo retouching, or photo masking, you know that precision is everything. For about four years now, my team and I have been helping businesses and individuals achieve stunning visual results, and one of the most fundamental skills we’ve honed is the art of creating perfect clipping paths.
I’m sharing a vital secret for truly seamless and professional outcomes: becoming an expert with anchor points to create perfect curves.. This isn’t simply drawing lines; it’s about knowing how these tiny points dictate the fluid movement and seamlessness of your curves, thereby shaping the final quality of your clipping path.
Why Seamless Curves are Essential for Clipping Path Success
You might be wondering, "Why are curves so important? Aren't straight lines easier?" Well, yes, straight lines are simpler, but in the real world, very few objects are made up of only straight edges. Think about a product shot of a coffee mug, a person's hair, or even a leaf – all of these have natural, flowing curves.
When making a clipping path, your primary aim is to completely separate an object from its background.. If your curves are jagged, bumpy, or don't accurately follow the object's contours, the final cutout will look unnatural and unprofessional. This is where seamless curves become absolutely vital.
A perfectly executed clipping path with seamless curves ensures:
- Natural-looking cutouts The object looks like it truly belongs in its new environment.
- Professional finish It elevates the overall quality of the image, making it suitable for e-commerce, catalogs, marketing materials, and more.
- Time-saving in the long run While it might take a little more effort initially, mastering this skill reduces the need for constant adjustments and touch-ups.
- Client satisfaction stems from happy clients, and providing high-quality clipping path services is essential for ensuring they return.
“MASTERING ANCHOR POINTS IN PHOTOSHOP’S PEN TOOL IS ESSENTIAL FOR CREATING SMOOTH, PRECISE CLIPPING PATHS AND SEAMLESS CURVES.”
— Brian Wood, Adobe Photoshop CC Classroom in a Book
Understanding Anchor Points in Clipping Path Work
Before we dive into the nitty-gritty of curves, let's make sure we're all on the same page about anchor points. In most vector-based software (like Adobe Photoshop or Illustrator, which are commonly used for clipping paths), an anchor point is a fundamental building block of any path.
Think of an anchor point as a "pin" that holds your path in place. When drawing a path, you're basically placing a sequence of these pins. The lines or curves connecting these pins form your actual path.
When working with anchor points, you'll primarily find two types:
- Corner points These create sharp, abrupt changes in direction. Imagine the corner of a square.
- Smooth points (or curve points) These create smooth, flowing curves. These are what we'll focus on today!
The magic of smooth points lies in their "handles" or "direction lines." These are lines that extend from the anchor point, and by manipulating them, you can control the shape and how the curve bends from that point.
The Pen Tool for Precise Clipping Path Creation
The Pen Tool is nearly always the main way we create clipping paths and adjust anchor points. It might seem intimidating at first, but once you understand its logic, it becomes incredibly powerful.
To create anchor points using the Pen Tool, you just click your mouse. The key to seamless curves lies in how you click and drag.
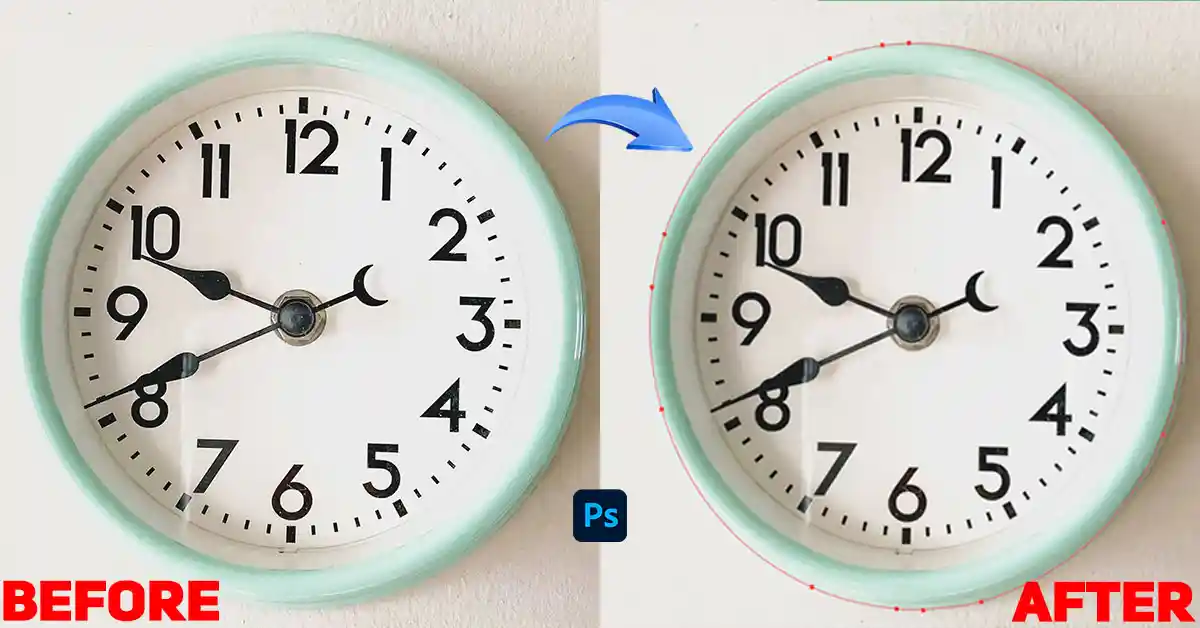
Step-by-Step Guide: Creating Circular Clipping Paths with the Elliptical Marquee Tool
For objects that are perfectly round or elliptical, the Pen Tool can still be used, but the Elliptical Marquee Tool offers a faster and more precise method for creating circular clipping paths. Here's how:
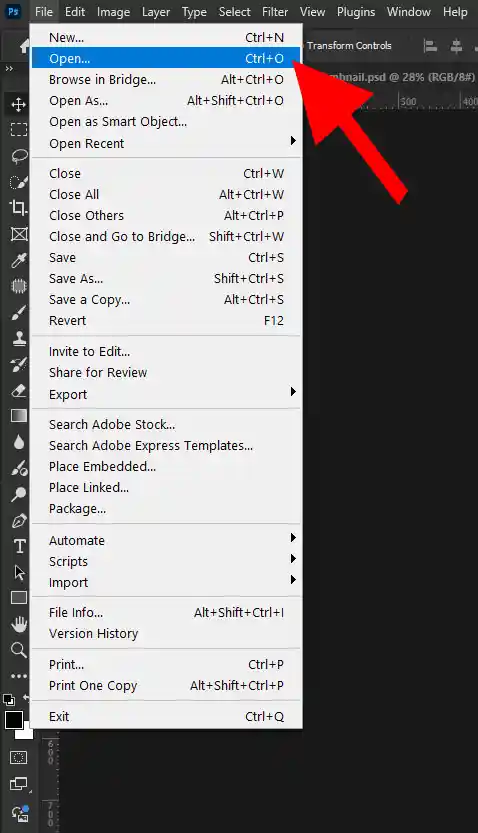
Step 01: Opening the Image
Select "Open" from the "File" menu.
Step 02: Selecting Image
Select the image and click on open option.

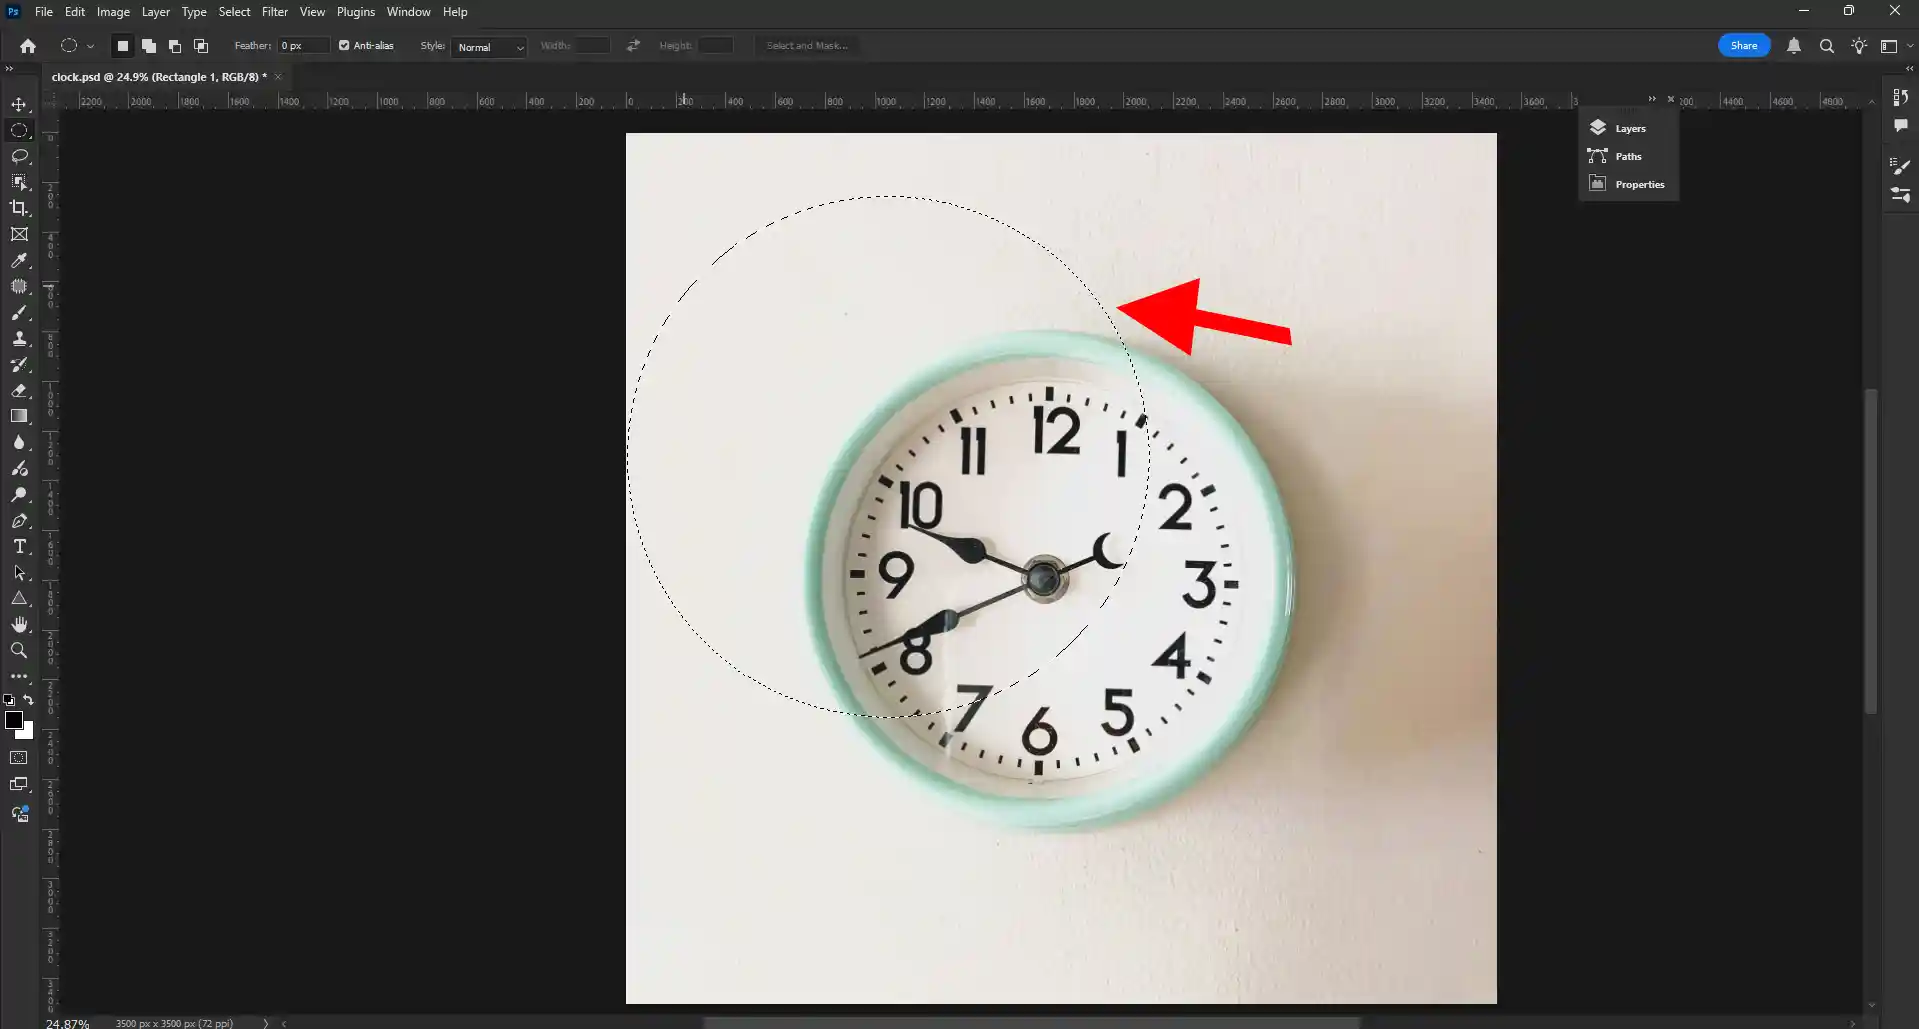
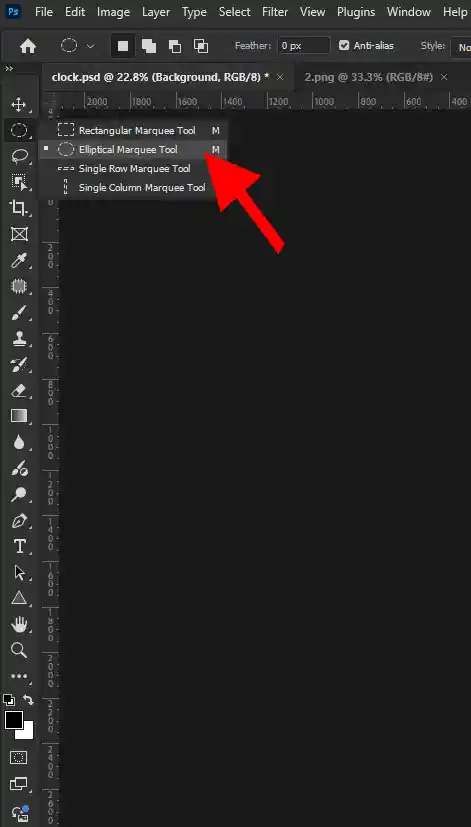
Step 03: Selecting the Elliptical Marquee Tool
Go to your left toolbar and select the Elliptical Marquee Tool.

Step 04: Making a Perfect Round Shape
To make a perfectly round shape that surrounds your object, press and hold Shift + Alt on Windows or Shift + Option on a Mac, then drag your mouse.
Pressing Shift will make the shape a perfect circle, while holding Alt/Option lets you draw it from its center.
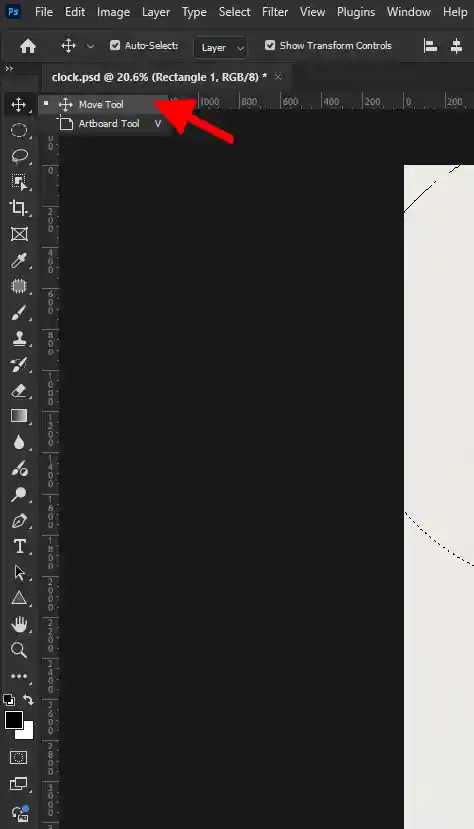
Step 05: Selecting Move Tool
Go to your left toolbar and select the Move Tool.
Step 06: Placing The Selection
Drag the selection to the perfect position over your object.

Step 07: Reselecting The Elliptical Marquee Tool
Select the Elliptical Marquee Tool again. This might seem counterintuitive, but it's necessary for the next step.
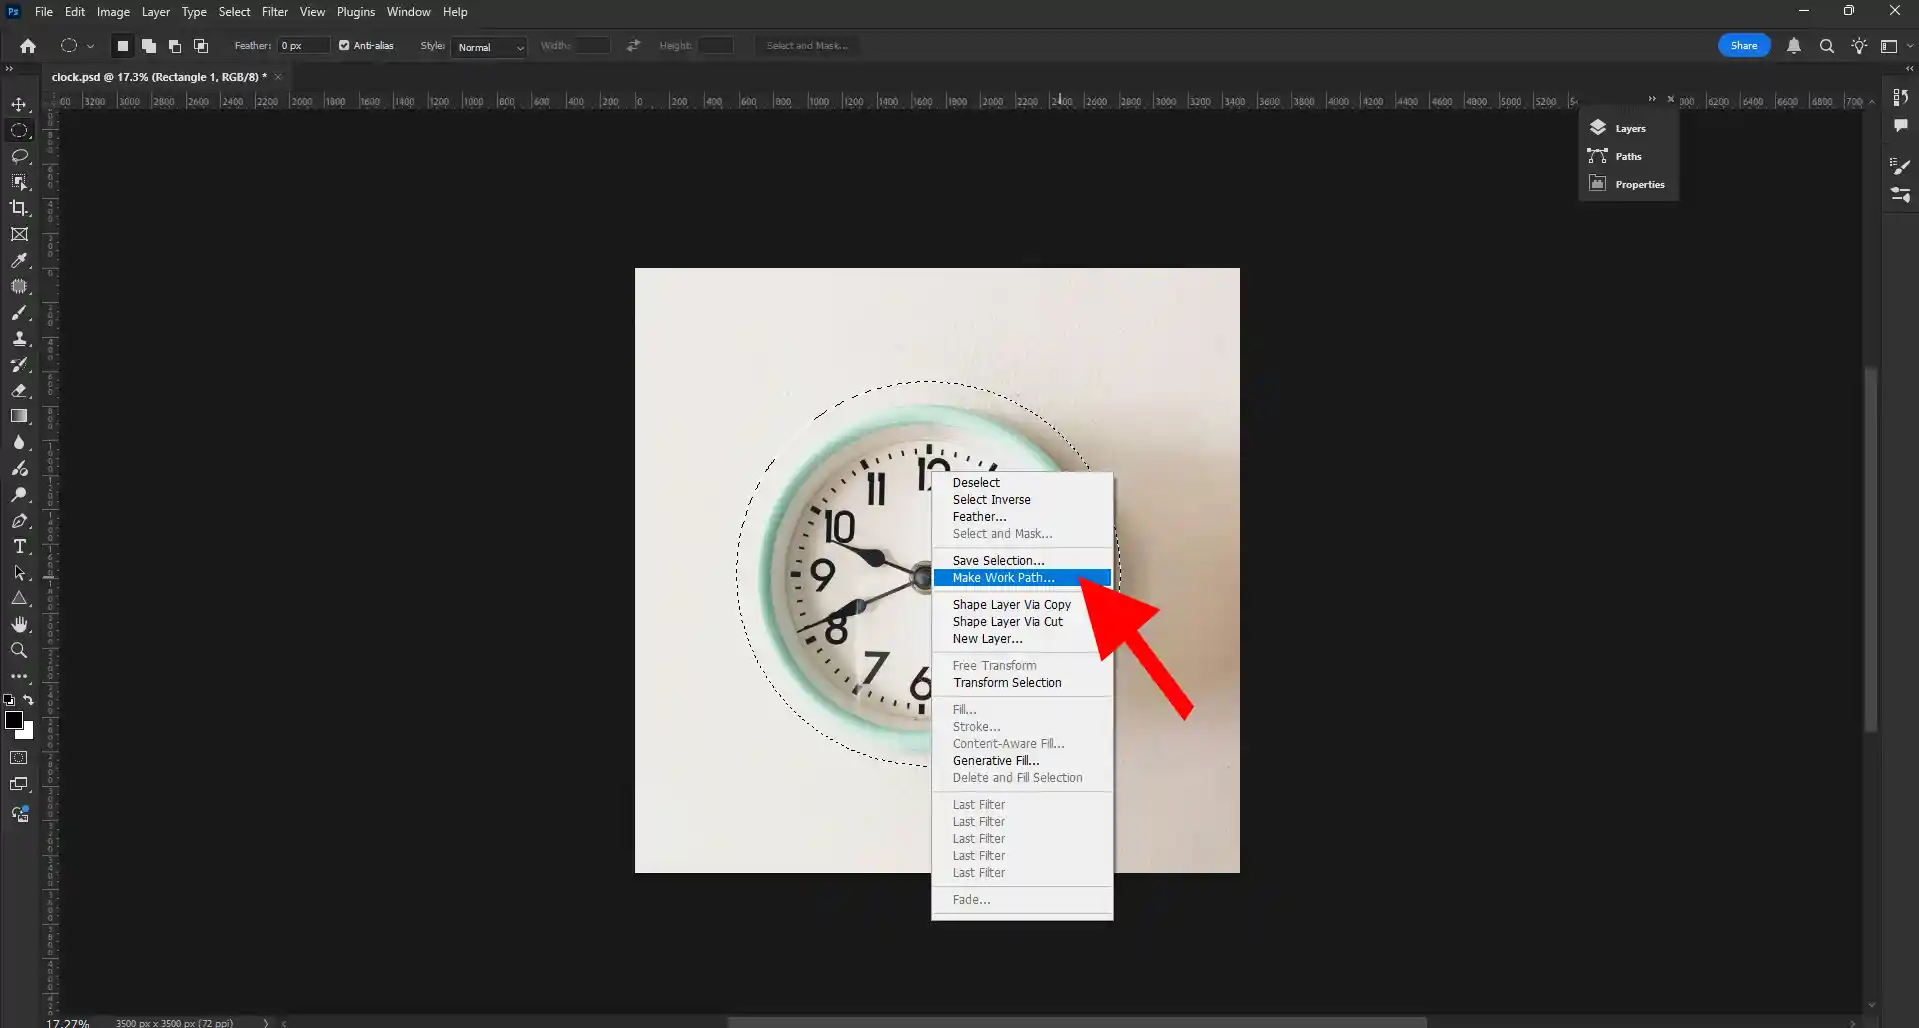
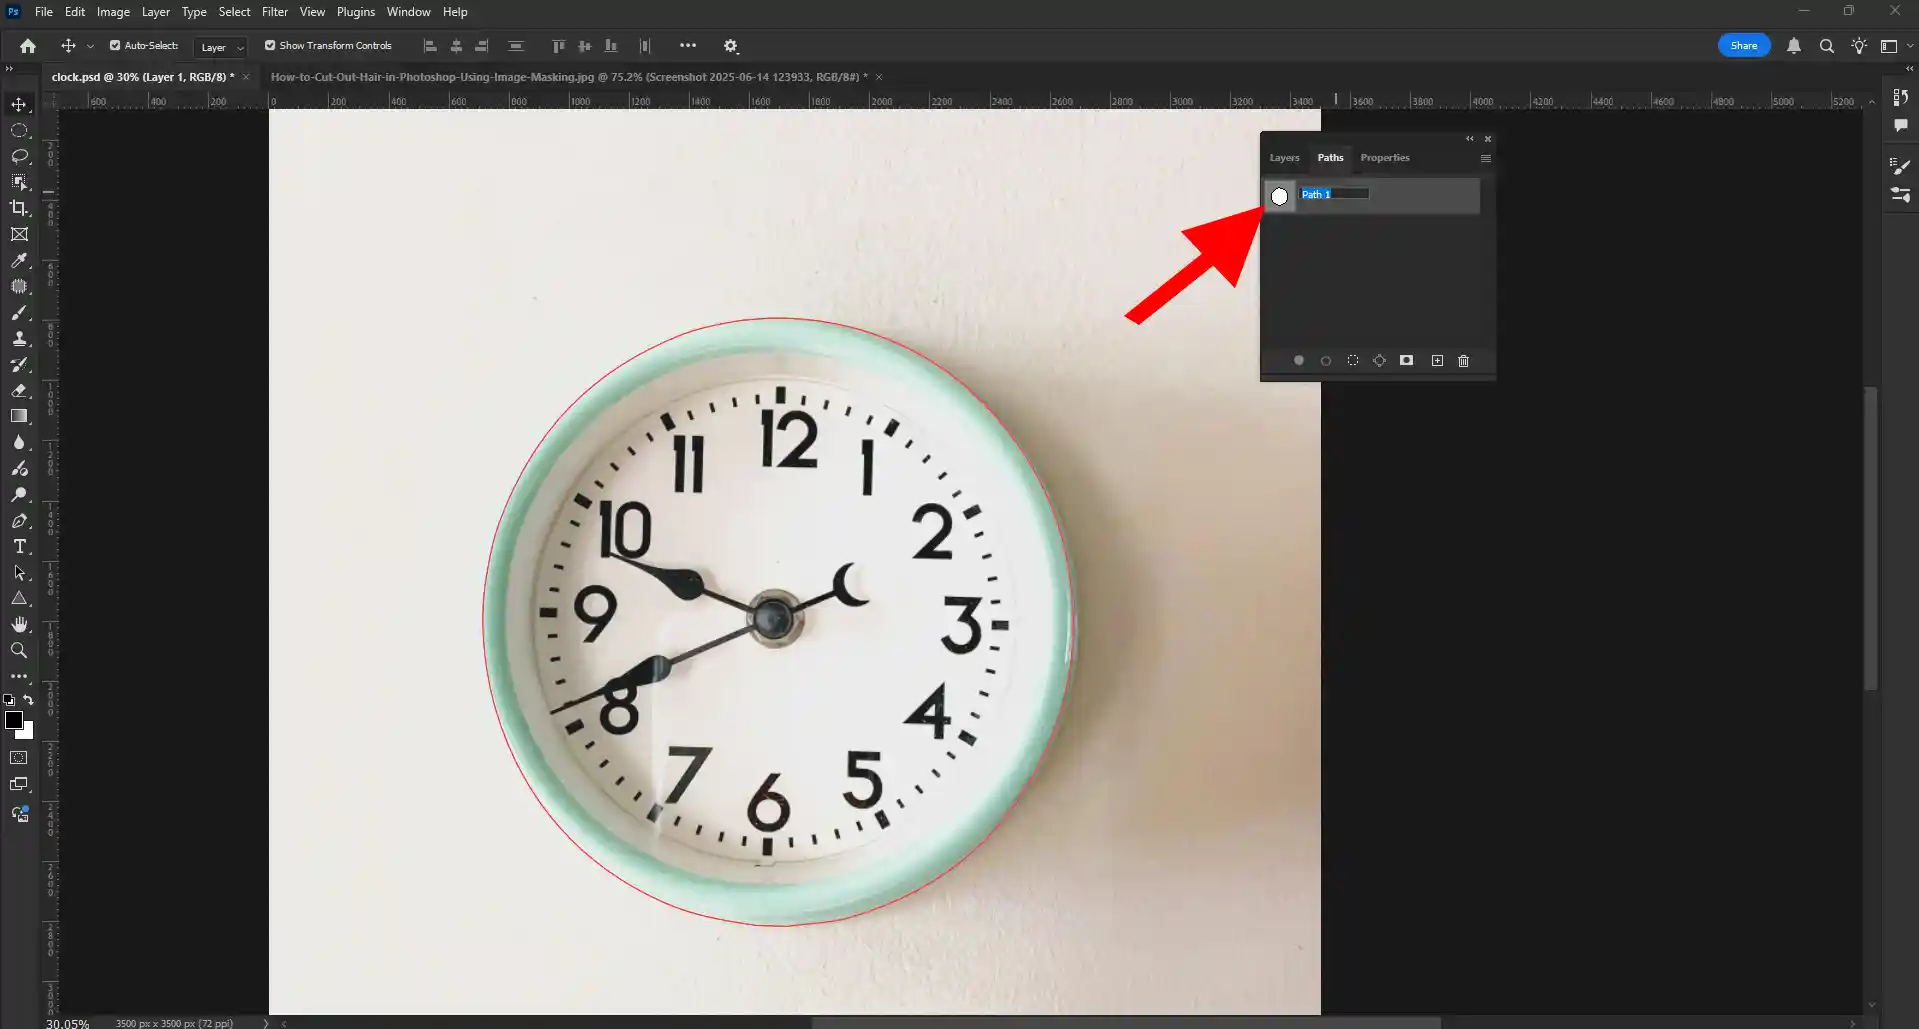
Step 08: Making Work Path
Click right button and select make work path option.
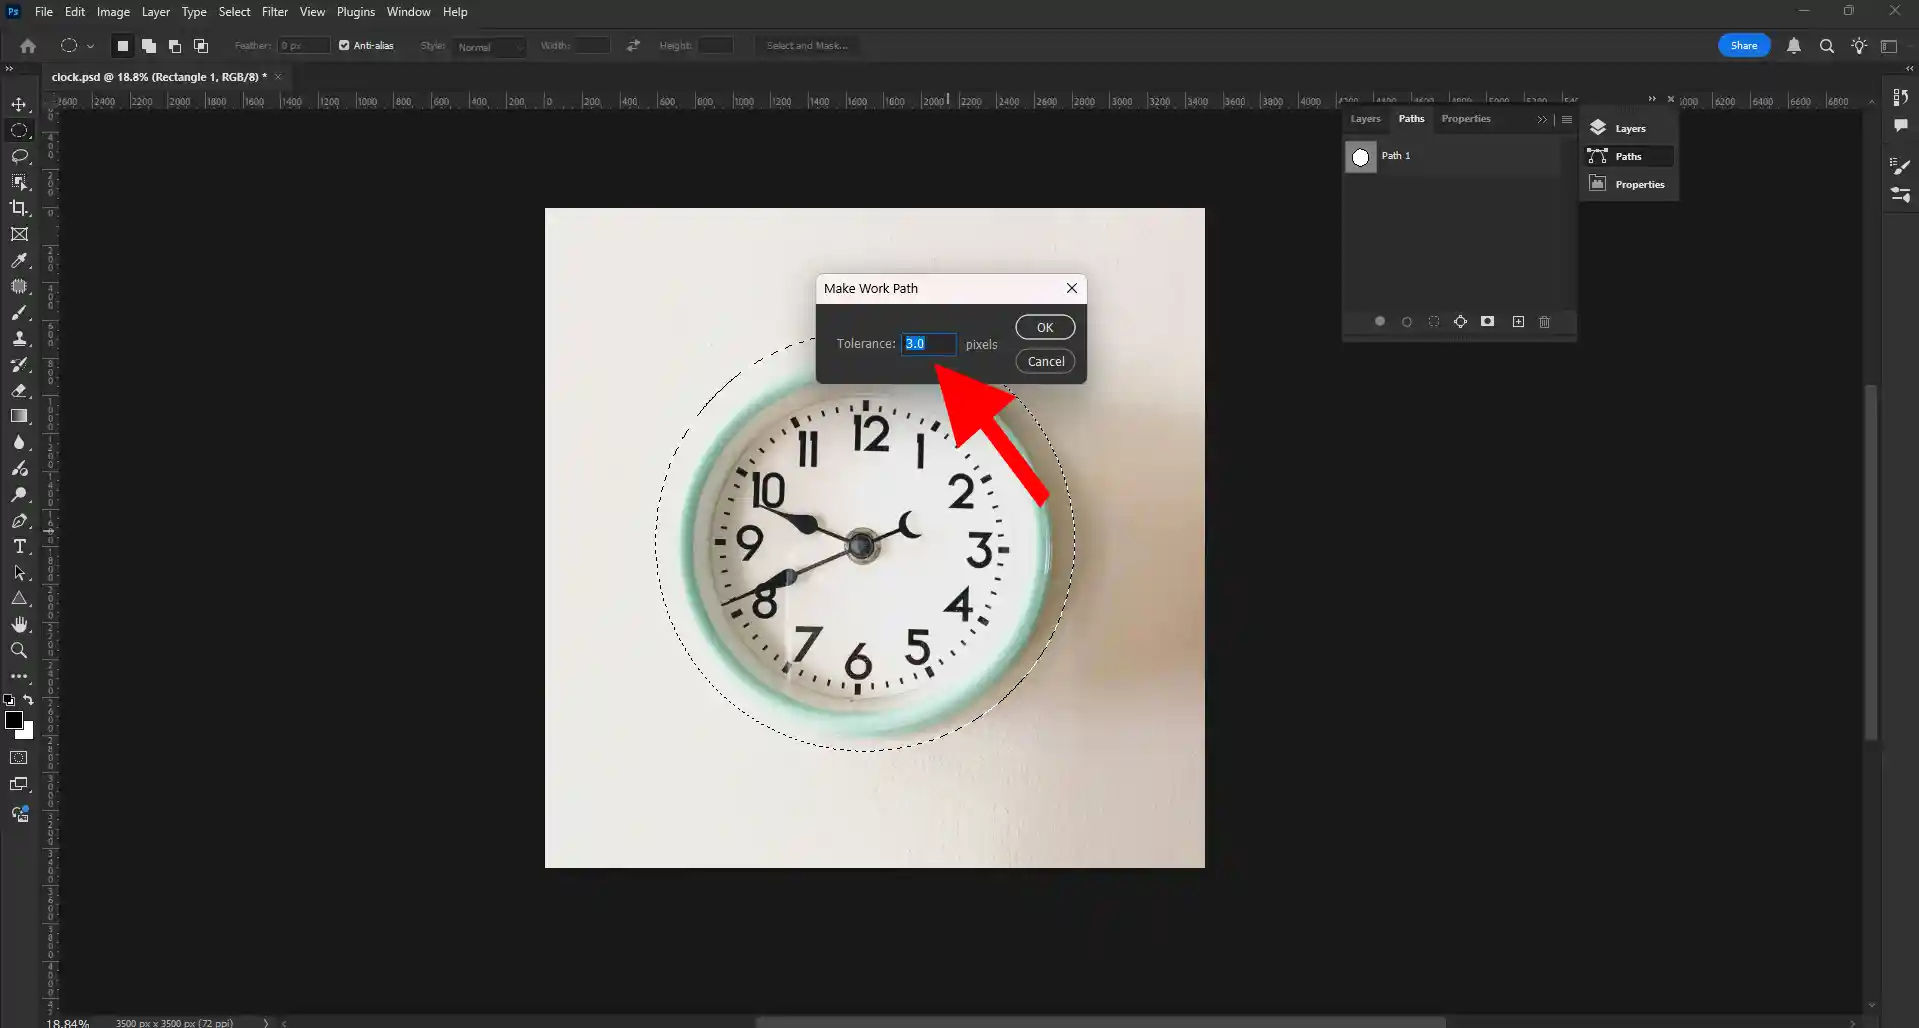
Step 09: Selecting Tolerance
In the pop-up window, set the Tolerance to 3.0 and press OK. This converts your selection into a vector path.
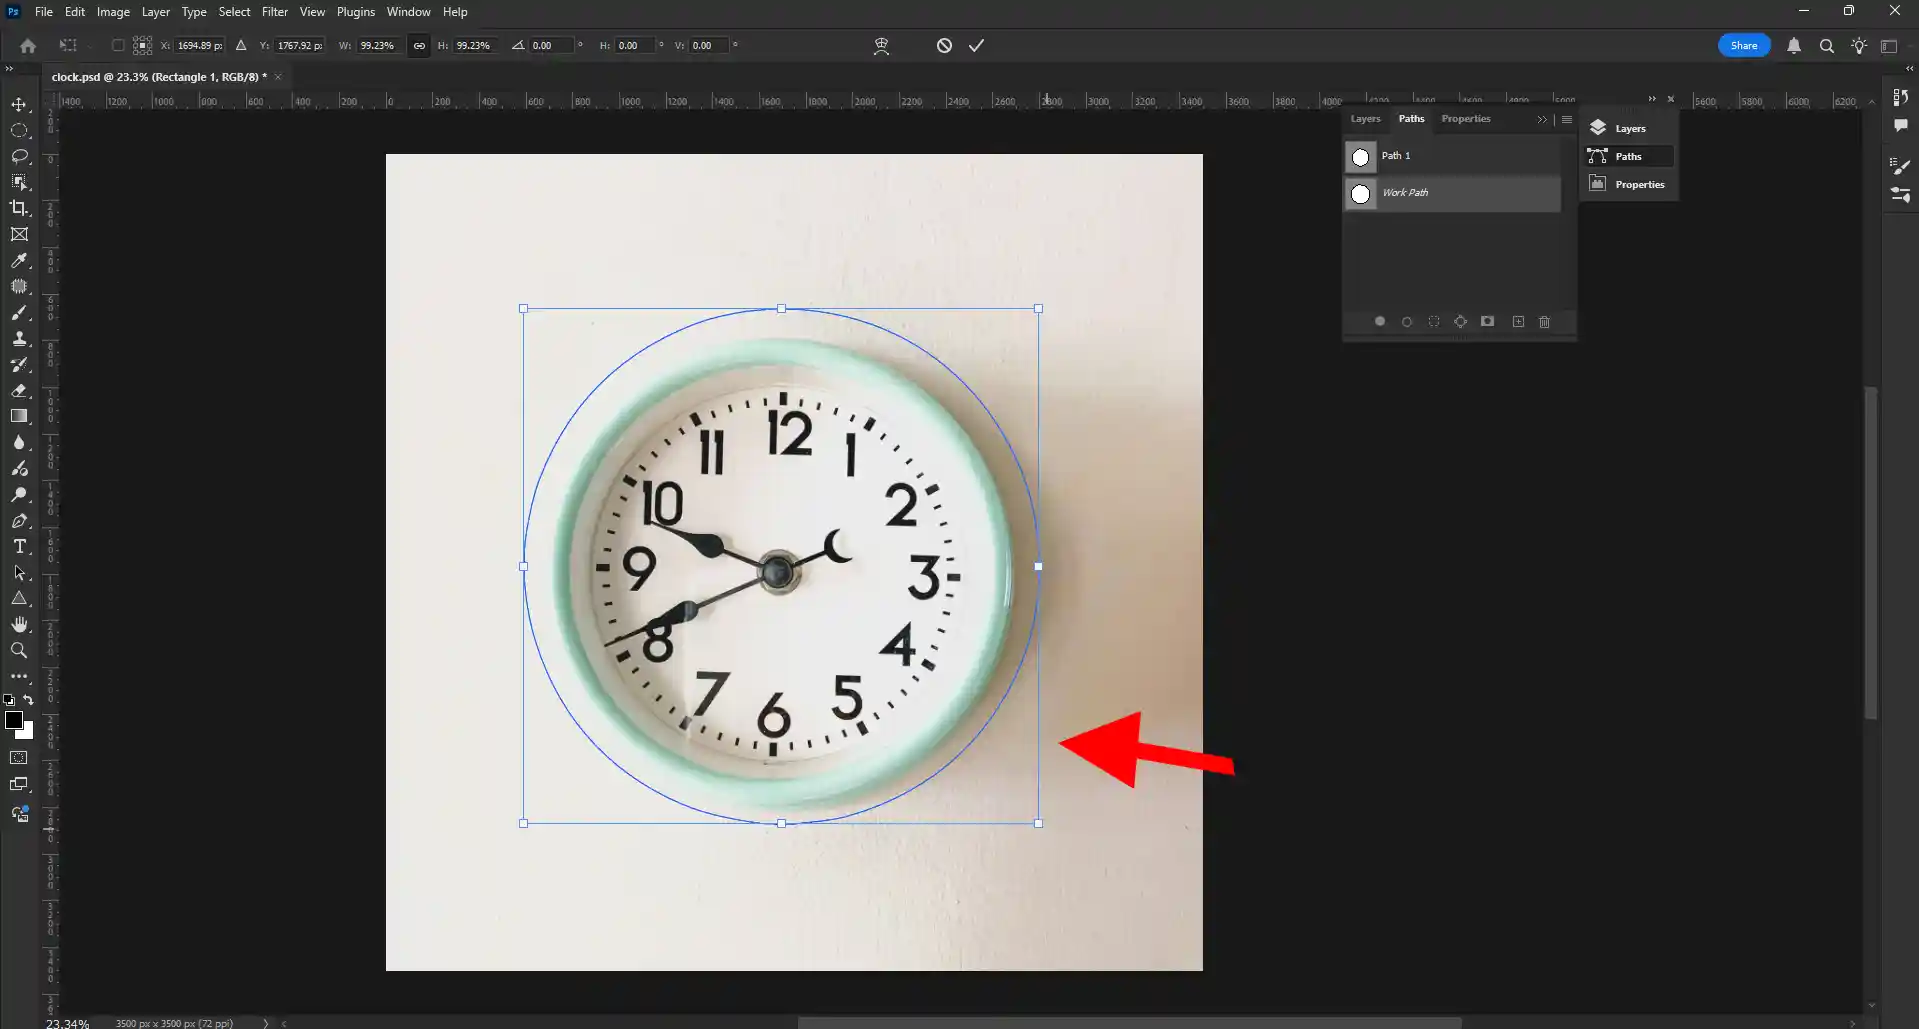
Step 10: Transforming The Shape
Press Ctrl + T (Windows) or Cmd + T (Mac) to activate the Free Transform tool for the path.
Step 11: Fixing The Round Shape
Hold Alt and drag it from the corner to make the round shape as it is like the object.
This will scale the path proportionally from its center, allowing you to fine-tune the round shape to perfectly match your object.
Step 12: Renaming Path Name
Double-click on the newly created path in the Paths panel and rename it for better organization (e.g., "Product Clipping Path").
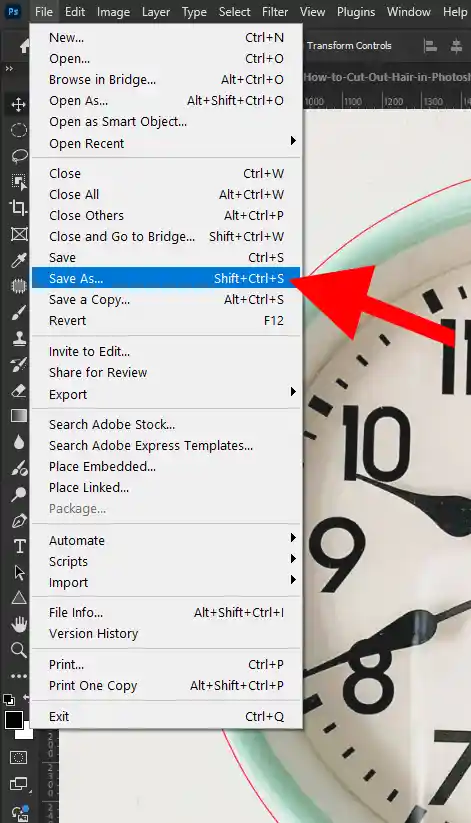
Step 13: Saving The Image
- Go to your right side and click on the File option.
- Then click on Save As option.
- Now save it as you wanted. You can save it as JPEG, PSD, or other formats suitable for your needs.
Finally, your work is done!
Advanced Methods for Smooth Curve Creation in Clipping Paths
You’ve got the basics down, but to truly master anchor points for seamless curves, here are some advanced tips I’ve picked up over my four years of providing clipping path service:
Tip 1 Plan Your Clipping Path Curves Ahead
Before you even place your first anchor point, try to visualize the entire curve. Where does it begin, where does it finish, and what’s its path in the middle? This foresight helps you strategically place your anchor points, reducing the need for constant adjustments.
Tip 2 The “Less is More” Philosophy for Clipping Path Anchor Points
I cannot stress this enough: use the fewest possible anchor points to define your curves. Having too many anchor points can result in paths that look jagged or uneven. Fewer anchor points lead to curves that are both smoother and more graceful, and they’re also simpler to edit afterward. It takes practice, but aim to capture the essence of a curve with minimal points.
Tip 3 Use Keyboard Shortcuts for Faster Clipping Paths
Using keyboard shortcuts will greatly increase your efficiency and make the creation process much smoother.
- Ctrl/Cmd + Click (with Pen Tool) Temporarily switches to the Direct Selection Tool, allowing you to adjust anchor points and handles without switching tools.To switch back to the Pen Tool, simply release the keys.
- Alt/Option + Click and Drag (with Pen Tool) offers a quick way to switch to the Convert Point Tool. With this, you can disrupt the symmetry of handles or alter anchor points on the fly.
- P Selects the Pen Tool.
- A Selects the Direct Selection Tool.
Tip 4 Practice and Refine Your Clipping Path Skills
Mastering seamless curves is a skill that improves with practice. Start with simple shapes, then move on to more complex objects. The more you use the Pen Tool and experiment with anchor points and handles, the more intuitive it will become. Try tracing different everyday objects in images – a coffee cup, a flower, a car – and focus on getting those curves just right.
Tip 5 When to Use Corner Points in a Curved Clipping Path
While we’re focusing on seamless curves, remember that sometimes a curve will transition into a sharp corner. In these cases, you’ll want to:
- Place a smooth anchor point to define the end of your curve.
- Use the Convert Point Tool (Alt/Option + click with Pen Tool) on that same anchor point to “break” one of its handles, allowing you to create a sharp corner from that point.
- Then, simply click to create your next corner point, and the path will transition sharply.
This technique is essential for objects like a leaf with a smooth edge that suddenly meets a sharp stem.
Tip 6 The Impact of Smooth Curves on Clipping Path Service Quality
For me, as someone who has been providing clipping path service for years, the quality of the curves directly reflects the professionalism of the work. When a client receives a cutout with perfectly smooth, natural-looking edges, they immediately see the value. This attention to detail is what separates average clipping path providers from truly expert ones. Seamless curves are not just an aesthetic choice; they are a mark of precision and expertise.
Tutorial Video for Clipping Path Mastery
I’ll now guide you through a practical example in the next section. I’ll link to a tutorial video that demonstrates these techniques in real-time.
Personalizing Your Clipping Path Workflow
After four years of dedicated work in photo editing, I’ve learned that everyone develops their own rhythm and preferences. While these techniques are fundamental, feel free to experiment and find what works best for you.
- Experiment with handle lengths Some people prefer shorter, more precise handles, while others like longer ones that control more of the curve.
- Practice different objects Don’t just stick to simple shapes. Challenge yourself with objects that have very intricate or unusual curves.
- Learn from your mistakes Every time a curve doesn’t look right, analyze why. Was an anchor point misplaced? Were the handles excessively long or unusually short? This self-correction is key to improvement.
- Automate repetitive tasks While mastering the Pen Tool is manual, consider actions or scripts for the final steps of converting paths to selections and masking, especially if you offer a high-volume clipping path service.
The Impact of Mastering Seamless Curves on Your Clipping Path
Mastering anchor points for seamless curves will dramatically elevate the quality of your clipping paths. It’s the difference between a rough, amateurish cutout and a professional, polished image that seamlessly integrates into any design. For businesses that rely on high-quality product images, this skill is not just a nicety – it’s a necessity. It ensures that your clipping path service is top-notch, leading to happier clients and a stronger reputation in the market.
Whether you’re doing a simple background removal or a complex photo retouching job, the foundation of a clean cutout lies in your ability to control those tiny but mighty anchor points.
CONCLUSION
I hope this in-depth guide helps you on your journey to mastering anchor points for seamless curves in any clipping path.This skill requires dedication and experience to master, yet it offers significant benefits. Remember, precision, patience, and a good understanding of the Pen Tool are your best friends.Keep practicing, keep refining, and soon you'll be creating perfect, seamless cutouts that truly stand out.We'd love to hear your questions or tips—just leave a comment below! For even more insights, tutorials, and behind-the-scenes content, make sure to follow us on platforms like Facebook, Instagram, Pinterest, Behance, and subscribe to our YouTube channel – we're always sharing new ways to elevate your photo editing game! Happy editing!
